
Tracking Revisions in LaTeX
As a PhD student, an essential part of my job is sending drafts to my advisor for his feedback.
Because his time is limited, it is crucial that I direct his attention to the parts of the document that I modified.
A useful tool for tracking changes is the changes LaTeX package.
To import the package, add \usepackage{changes} to your document’s preamble.
The changes package defines four types of annotations: \added, \deleted, \replaced, and \comment and also imports the \todo macro from the todo package.
Example:
Here is \added{added}, \deleted{deleted}
and \replaced{replaced}{replaysed} text.
\comment{Maybe I shouldn't have written this?}
\todo[inline]{To-do: Write something worthwhile.}
Output:

Workflow
In order for annotations to be useful they must be up-to-date. This raises the question of when to remove annotations. The best workflow depends on the way your reviewer gives feedback. If your reviewer will read the entire document, then you can delete annotations immediately after sending them a draft. In my case, however, my advisor only reads a portion of each draft I send, so I leave annotations until he has given feedback. To this motivates the following workflow:
- Annotate each change to the PDF.
- Compile PDF and share with reviewer.
- Commit changes to the source code into Git or another source control management software. (If you aren’t tracking the changes to your source code, then start!)
- Wait for reviewer to give comments or continue editing the document (as in step 1).
Once the reviewer gives you comments:
- Commit current version to Git.
- Delete the annotations only from the sections of the document that were reviewed.
- Commit the new version, without the deleted annotations.
Annotating Blocks of Text
When annotating a sentence or more, I format my LaTeX code with \added{ and } on their own lines.
Including % immediately after \added{ and after } prevents LaTeX from inserting extra spaces (LaTeX treats a new line in the code the same as a space).
\added{%
  Lorem ipsum dolor sit amet, consectetur
  adipiscing elit, sed do eiusmod tempor
  incididunt ut labore et dolore magna aliqua.
}% End \added block
If you use Visual Studio Code, see below for snippets that will wrap selected text in annotation commands.
The commands \added, \deleted, and \replaced cannot contain a paragraph break.
This precludes empty lines, such as
\added{
  % Paragraph 1
  Lorem ipsum dolor sit amet, consectetur
  adipiscing elit, sed do eiusmod tempor
  incididunt ut labore et dolore magna aliqua.

  % Paragraph 2 (Causes error!)
  Duis aute irure dolor in reprehenderit
  in voluptate velit esse cillum dolore
  eu fugiat nulla pariatur.
}
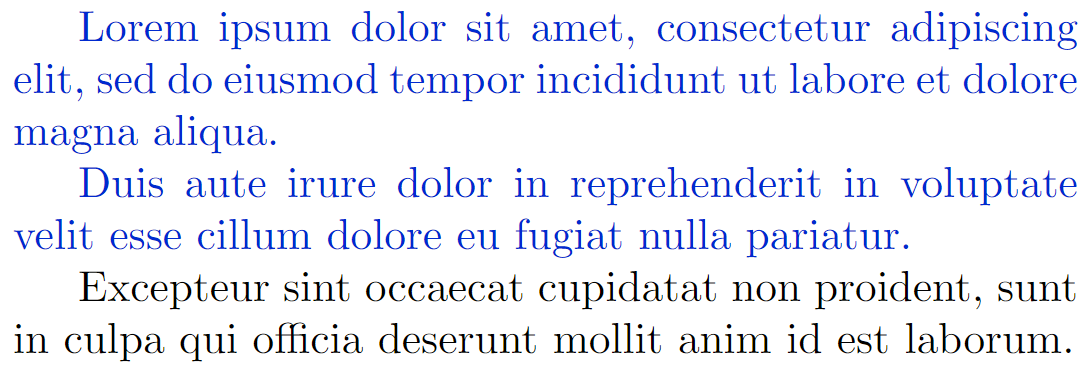
To mark multiple paragraphs as changed, I define a new color called added using the xcolor package
\usepackage{xcolor}
\colorlet{added}{blue!80!black}
Then, add \color{added} before a multiple paragraph change, and add \color{black} afterward.
\color{added}
% Paragraph 1 (Added)
Lorem ipsum dolor sit amet, consectetur
adipiscing elit, sed do eiusmod tempor
incididunt ut labore et dolore magna aliqua.

% Paragraph 2 (Added)
Duis aute irure dolor in reprehenderit
in voluptate velit esse cillum dolore
eu fugiat nulla pariatur.
\color{black}

% Paragraph 3 (No change)
Excepteur sint occaecat cupidatat non
proident, sunt in culpa qui officia
deserunt mollit anim id est laborum.
Output:
Package Configuration
There are various package options. For my documents, I use the following:
\usepackage[ % import "changes" package
    % If any of the changes commands are already defined, then the option "commandnameprefix=ifneeded"
    % tells changes to append "ch" to the name of the changes command in order to avoid a name collision.
    % Commonly, "\comment" will be changed to "\chcomment".
    commandnameprefix=ifneeded,
    % Changes imports the "todo" package. The following options are passed to the "todo" package.
    todonotes={colorinlistoftodos,
                prependcaption,
                textsize=small,
                backgroundcolor=orange!10,
                textcolor=black,
                linecolor=orange,
                bordercolor=orange} %
    % draft, % <- enable line to show annotations regardless of the document being in 'final' mode.
    % final, % <- enable line to hide annotations regardless of the document being in 'draft' mode.
]{changes}
For comments in the margin, the margin size for many document classes is too narrow, so it is necessary to adjust it.
One way to this is with the geometry package.
In the following snippet, we also use the ifdraft package so that our changes to the margins only apply in draft mode.
% Create \ifdraft{}{} conditional
% that switches based on whether "draft"
% is passed to document class.
\usepackage{ifdraft}
\ifdraft{
    % Adjust spacing to fit margin notes.
    \usepackage[inner=20mm, outer=40mm,
            marginparwidth=34mm]{geometry}
}{}
My full LaTeX configuration file is available here.
Resolve Name Conflict For \comment Command
There are several packages that define a \comment command that would clash with the one defined by changes.
If the prependcaption is included in the options for changes, then \comment is automatically renamed to \chcomment and a warning is shown.
I would prefer to use \comment for the changes command, however.
To do this, you can redefine the existing \comment command.
If comment is an environment, as is defined by the verbatim package, then you must redefine both \comment and \endcomment, prior to importing changes, as follows:
% Redefine "comment" environment (from "verbatim" package)
% to "commentsection" so that \comments{} can be defined
% by the `changes` package.
\makeatletter
\let\commentsection\comment
\let\endcommentsection\endcomment
\let\comment\@undefined
\let\endcomment\@undefined
\makeatother
Defining Added/Deleted Environment Blocks
The changes package only defines macros for added, deleted, and replaced text, but not environments.
Although macros are fine for short text, they have downsides for long blocks of text.
For example, you cannot put empty lines of code, e.g., to write multiple paragraphs, in the argument of \added{} (the result is a cryptic Paragraph ended before \addcontentsline was complete. error).
Furthermore, any errors that occur with the argument of \added{} are marked at the end of \added{}, making it difficult the source of errors if the text inside \added{} is long, possibly including several sentences or equations.
Similarly, SyncTeX does not locate specific code with an \added{} macro, making it more difficult to navigate between your code and PDF.
To fix all of these problems, I define environment versions of \added{} and \deleted{} as follows:
% Define environments for blocks of deleted text.
\usepackage{ifdraft}% Provides macros for testing if in draft or final mode.
\usepackage{xcolor}%
% We use \NewEnviron from environ to create environments that do not show their contents.
\RequirePackage{environ}
\definecolor{deletedColor}{rgb}{0.760, 0.000, 0.000}% Hex: #C20000FF (dark red)
\definecolor{addedColor}  {rgb}{0.169, 0.243, 0.714}% Hex: #2B3EB6FF (dark blue)
\NewEnviron{addedblock}{%
    \ifoptionfinal{%
        \BODY% Added content is inserted without modification in final version.
    }{% If not final, then show color
        {\color{addedColor}\BODY}%
    }%
}
\NewEnviron{deletedblock}{%
    \ifoptionfinal{%
        % Deleted content is omitted in final version.
    }{% If not final, then show color
        {\color{deletedColor}\BODY}%
    }%
}
An example of the usage is
\begin{addedblock}%
    Here is some text.

		Here is a new paragraph.
\end{addedblock}
I have not defined a replacedblock environment because there is not a straightforward way to give the added and deleted text.
To indicate deleted text, I simply combine an addedblock and a `deletedblock:
\begin{addedblock}% Start of replacement text
This is new text.
\end{addedblock}% End of replacement text
\begin{deletedblock}% Start of replaced text
    This is old text.
\end{deletedblock}% End of replaced text
I wrote the several snippets to make these environments easy to use in VS Code. See the section on “Visual Studio Configuration”, below for more info about defining snippets.
"Added Block Environment":{
	"prefix": ["\\addedblock"],
	"body": [
		"\\begin{addedblock}%",
		// Do not indent the added text because we want to
		// eventually delete \begin{added} and \end{added}
		// without needing to reformat the code.
		"${0:$TM_SELECTED_TEXT}",
		"\\end{addedblock}%"
	]
},
"Deleted Block Environment":{
	"prefix": ["\\deletedblock"],
	"body": [
		"\\begin{deletedblock}%",
		"\t$TM_SELECTED_TEXT",
		"\\end{deletedblock}%",
		"$0"
	]
},
"Replaced Block Environment":{
	"prefix": ["\\replacedblock"],
	"body": [
		"\\begin{addedblock}% Start of replacement text",
		// Do not indent the added text because we want to
		// eventually delete \begin{added} and \end{added}
		// without needing to reformat the code.
		"${0:$TM_SELECTED_TEXT}",
		"\\end{addedblock}% End of replacement text",
		"\\begin{deletedblock}% Start of replaced text",
		"\t$TM_SELECTED_TEXT",
		"\\end{deletedblock}% End of replaced text"
	]
},
Visual Studio Configuration
When writing LaTeX with Visual Studio Code, you can define snippets that are automatically inserted when you type particular text.
To set up snippets, type CTRL+SHIFT+P, type Preferences: Configure User Snippets, and select latex.json.
Add the following code to latex.json:
{
	"Added":{
		"prefix": ["\\added"],
		"body": [
			"\\added{$TM_SELECTED_TEXT$1}$0"
		]
	},
	"Added Block":{
		"prefix": ["\\added%", "\\addedblock"],
		"body": [
			"\\added{%",
			"\t$TM_SELECTED_TEXT$0",
			"}% End \\added block",
			"" // Ensure there is a new line at end
		]
	},
	"Deleted":{
		"prefix": ["\\deleted"],
		"body": [
			"\\deleted{$TM_SELECTED_TEXT$1}$0"
		]
	},
	"Deleted Block":{
		"prefix": ["\\deleted%", "\\deletedblock"],
		"body": [
			"\\deleted{%",
			"\t$TM_SELECTED_TEXT$0",
			"}% End \\deleted block",
			"" // Ensure there is a new line at end
		]
	},
	"Replaced":{
		"prefix": ["\\replaced"],
		"body": [
			"\\replaced{$TM_SELECTED_TEXT$1}{$TM_SELECTED_TEXT}$0"
		]
	},
	"Replaced Block":{
		"prefix": ["\\replaced%", "\\replacedblock"],
		"body": [
			"\\replaced{% New Text",
			"\t$TM_SELECTED_TEXT$0",
			"}{% Old Text",
			"\t$TM_SELECTED_TEXT",
			"}% End \\replaced block",
			"" // Ensure there is a new line at end
		]
	}
}
For each command \added, \deleted, and \replaced, there are two versions of snippets an “inline” version and a “block” version.
To use the block version append % or block.
For example, to add a \replaced block:
- Select the text you are replacing.
- Type
\replaced%or\replacedblock. The selected text will temporarily disappear as you type. - Select “Replaced Block” from the drop-down menu. At this point, the text you had selected reappears in both arguments of
\replaced. - Modify the first argument to the new version.
I find the \replaced block snippet particularly useful because the comments % New Text and % Old Text remind me of the order of the arguments, which I always forget.
COMMENTS
You can use your Mastodon account to comment on this article by replying to the associated post.