
LaTeX in VS Code
VS Code is a powerful LaTeX editor. In this post, I outline my setup for creating LaTeX documents in VS Code, leveraging various extensions, tools, and settings to enhance document creation, collaboration, and organization.
In this document, I describe how to use and configure VS Code to achieve the following:
- Compilation of LaTeX documents in VS Code with SyncTeX to jump between locations in the code and the PDF.
- Spell checking and grammar checking with support for LaTeX syntax.
- Pasting images into LaTeX documents.
- Collaboratively editing documents hosted on Overleaf.
- LaTeX “snippets” for actions like toggling between inline equations (i.e.,
$...$) and display equations (\[...\]). - Custom linting tools for quickly identifying syntax errors (before compiling), and highlighting formatting or coding errors.
VS Code Settings
This section describes the VS Code settings I use, along with the VS Code Extensions described below, for my LaTeX editing environment.
In my LaTeX projects, I use the following settings to help VS Code handle LaTeX-related file formats correctly.
  // Treat new files (before first save) as LaTeX files.
  "files.defaultLanguage": "latex",
  // Treat LaTeX package (.sty) and class (.cls) files as LaTeX files.
  "files.associations": {
      "*.sty": "latex",
      "*.cls": "latex"
  },
  // Hide the following file types from the VS Code folder list.
  "files.exclude": {
      "**/*.4ct": true,
      "**/*.4tc": true,
      "**/*.fdb_latexmk": true,
      "**/*.idv": true,
      "**/*.lg": true,
      "**/*.lof": true,
      "**/*.synctex.gz": true,
      "**/*.synctex(busy)": true,
      "**/*.tmp": true,
      "**/*.xref": true,
      "**/*.fls": true,
      "**/*.loc": true,
      "**/*.run.xml": true,
      "**/*.soc": true,
      "**/*.snm": true,
      "**/*.blg": true,
      "**/*-SAVE-ERROR": true
  },
VS Code Extensions
VS Code has many excellent extensions for writing LaTeX documents. My favorites are listed here, with descriptions of my settings for each extension included in the subsections below.
- LaTeX Workshop: Comprehensive support for LaTeX projects, including auto-completion, document compiling, syntax highlighting, and PDF preview.
- LTeX+: Grammar and spell-checking with support for LaTeX syntax.
- Paste Image: Simplifies inserting images into your project, allowing images to be directly pasted into LaTeX documents.
- Overleaf Workshop: Allows editing Overleaf Projects in VS Code.
- Dryer Lint: Allows for defining custom linting rules to highlighting writing errors that are specific to your context.
LaTeX Workshop
The LaTeX Workshop extension is the backbone of editing LaTeX in VS Code. I’ve listed the most useful features below—see the documentation for a full list of features and usage directions.
LaTeX Compilation
Automatic PDF compilation on edits or saves.
By default, LaTeX Workshop rebuilds each time a build fails. This is horrendously annoying, in my experience, since a build failure almost always requires manual intervention. To turn of auto re-building, use the following setting:
"latex-workshop.latex.autoBuild.cleanAndRetry.enabled": false,
LaTeX Workshop recompiles your document each time it is saved. By default, VS Code saves only when you do so manually. I prefer more frequent saves, namely each time I move my cursor out of the code editor:
"files.autoSave": "onFocusChange",
In addition to compiling on saves, I also use the following VS Code keybinding to compile when I hit CTRL+Enter:
{
  "key": "ctrl+enter",
  "command": "latex-workshop.build",
  "when": "editorLangId =~ /latex/"
}
By default, LaTeX builds with LaTeX Workshop puts output files in the directory containing your .tex file.
This quickly creates a cluttered mess, due to the numerous auxiliary files generated by the LaTeX build process.
To avoid clutter and allow for build files to be quickly deleted, change the out directory.
I use the following setting:
"latex-workshop.latex.outDir": "%DIR%/out_dir",
After changing "latex-workshop.latex.outDir", LaTeX Workshop’s "Clean up auxiliary files" command no longer deletes auxiliary files unless you also change this setting:
"latex-workshop.latex.clean.subfolder.enabled": true,
(Note: The “Clean up auxiliary files” command misses some file types, so for a full clean you should just delete all of the files in the folder manually.)
PDF Viewing and Syncing
For viewing PDFs, I configure LaTeX Workshop to open PDFs in a VS Code tab.
"latex-workshop.view.pdf.viewer": "tab",
The built-in PDF viewer supports SyncTeX that for navigating back and forth between locations source code and the matching location in the PDF.
If you are compiling a document that uses some specialized PDF features, such as animations in a Beamer animation, you may want to change "latex-workshop.view.pdf.viewer" to use an appropriate viewer.
By default, CTRL+Clicking (CMD+Clicking on macOS) on a PDF activates SyncTeX to navigate select the location in the code that was clicked on the document. I change the setting to make the behaviors match Overleaf, which uses double-clicking to jump to the code location:
"latex-workshop.view.pdf.internal.synctex.keybinding": "double-click",
To jump from the Code to the PDF, open the command pallet (CTRL+SHIFT+P) and run LaTeX Workshop: SyncTeX from cursor.
I also make some aesthetic changes to the PDF viewer. In particular, I change the background color beyond the border of pages to a shade of green that I find relaxing and make the page border the same color so it does not appear as a line (this helps prevent actual lines in the document from being overlooked if they happen to be at the edge of the page):
  "latex-workshop.view.pdf.color.dark.backgroundColor": "#809080",
  "latex-workshop.view.pdf.color.light.backgroundColor": "#809080",
  "latex-workshop.view.pdf.color.dark.pageBorderColor": "#809080",
  "latex-workshop.view.pdf.color.light.pageBorderColor": "#809080",
You can also display PDFs in “dark mode” by setting "latex-workshop.view.pdf.color.dark.pageColorsForeground" and "latex-workshop.view.pdf.color.dark.pageColorsBackground", but I find the resulting appearance hard to read.
Code Editor and Autocompletion
LaTeX Workshop has many built-in snippets that can be used for autocompletion, and enables syntax-aware autocompletion using VS Code’s IntelliSense feature.
For IntelliSense to work on LaTeX non-standard packages you have downloaded or written, you need to tell LaTeX Workshop where to find the packages.
  "latex-workshop.intellisense.package.dirs": [
    // List any folders that contain additional LaTeX package (.sty)
    // or class (.cls) files, so that intellisense will use them
    // for auto-complete suggestions.
    "packages",
    "%WORKSPACE_FOLDER%/packages"
  ],
  "latex-workshop.intellisense.package.extra": [
    "examplepackage1",
    "examplepackage2"
  ]
To make IntelliSense to update more frequently, enable this setting:
"latex-workshop.intellisense.update.aggressive.enabled": true,
In the code editor, LaTeX Workshop displays equation previews by default when you hover over an equation. I dislike these previews so I disable them.
  "latex-workshop.hover.preview.cursor.enabled": false,
  "latex-workshop.hover.preview.enabled": false,
LTeX+: Spell-checking and Grammar Checking for LaTeX
In LaTeX documents, standard document spell checkers and grammar checkers don’t work well due to the presence of non-text content, like equations and macros.
For example, the sentence “The function $f : \mathbb{R} \to \mathbb{R}$ are \emph{continuous}.” will confuse most checkers, which will show false positive for $f, \mathbb, etc., and will likely not identify the mismatched pluralization of “The function … are continuous”.
Fortunately, there is a checker called LTeX+ that is built specifically to handle LaTeX documents (LTeX+ is based on the now deprecated extension LTeX). In VS Code, the LTeX+ extension performs spell checking and grammar checking that is (mostly) aware of LaTeX syntax. LTeX+ does a pretty good job of catching mistakes “out of the box”, with its default settings, but adjusting the settings can allow it to catch more mistakes and have less false-positives.
Increase LTeX+ Pickiness
By default, LTeX+ only highlights spelling and grammar errors, but it also can provide a broader range of suggestions for “picky” rules. Many of the picky rules regard writing style, such as alerting you to sentences that are too long, or when several sentences in a row start with the same word. The following setting enables “picky” rules:
"ltex.additionalRules.enablePickyRules": true
Using picky rules produces more false-positives. To resolve false positives, you can disable specific rules by selecting text that violates the rule and selecting “Disable Rule” from the quick suggestions panel:
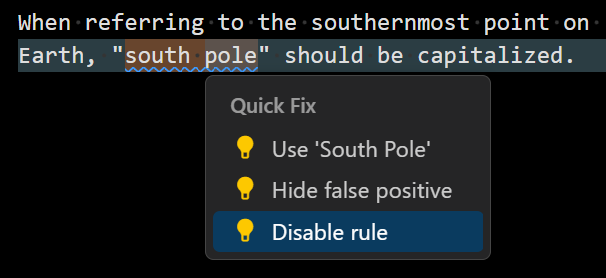
Alternatively, you can select “hide false positive”, as described below (see below), although I rarely use this feature.
Adjusting Severity Levels
By default, LTeX+ displays all problems using VS Code’s “Information” formatting, which results in serious issues, such as misspelled words, being lost in the shuffle of minor problems, like using a passive voice.
The severity of type of issue is set via the "ltex.diagnosticSeverity" setting.
I keep the default as "information", increase spelling errors to a "warning" level, and decrease the severity of some stylistic suggestions to “hints”.
For spelling, the name of the rule is "MORFOLOGIK_RULE_EN_US".
I use the following values for my "ltex.diagnosticSeverity" setting:
"ltex.diagnosticSeverity": {
        "default": "information",
        "MORFOLOGIK_RULE_EN_US": "warning", // Spelling errors.
        "PASSIVE_VOICE": "hint",
        "ENGLISH_WORD_REPEAT_BEGINNING_RULE": "hint",
        "TOO_LONG_SENTENCE": "hint"
    },
A full list of LTeX rules is available here.
Defining How LTeX+ Parses User-Defined LaTeX Commands
LTeX has built-in knowledge of some LaTeX macros or environments, but for LTeX+ to correctly check code with less common or user-defined macros or environments, we need to provide additional information via the "ltex.latex.commands" and “ltex.latex.environments” settings.
"ltex.latex.commands": {
  "\\tableofcontents[]": "ignore",
  "\\@ifclassloaded{}{}{}": "ignore",
  "\\includeonly{}": "ignore",
  "\\texttt{}": "dummy", // Inline formatting for code.
  "\\newbool{}": "ignore",
  "\\setbool{}": "ignore",
  "\\setbool{}{}": "ignore",
  // Macros and environments definitions
  "\\newcommand{}{}": "ignore",
  "\\renewcommand{}{}": "ignore",
  "\\newenvironment{}[][]{}{}": "ignore",
  "\\newenvironment{}[]{}{}": "ignore",
  "\\newenvironment{}": "ignore",
  "\\NewDocumentCommand{}{}{}": "ignore",
  "\\NewEnviron{}[]{}": "ignore",
  "\\newtheoremstyle{}{}{}{}{}{}{}{}{}": "ignore",
  "\\DeclarePairedDelimiterX{}[]{}{}": "ignore",
  "\\DeclarePairedDelimiter{}{}{}": "ignore",
  // Beamer
  "\\setbeamertemplate{}[]{}": "ignore",
  "\\setbeamercolor{}{}": "ignore",
  "\\setbeamerfont{}{}": "ignore",
  "\\usebeamercolor[]{}": "ignore",
  "\\usebeamertemplate{}[]": "ignore",
  "\\setbeamertemplate{}{}": "ignore",
  "\\setbeamertemplate{}[]": "ignore",
  "\\usebeamertemplate{}[]{}": "ignore",
  "\\setbeamerfont{}": "ignore",
  "\\addtolength{}{}": "ignore",
  "\\movie{}{}": "ignore",
  "\\movie[]{}{}": "ignore",
  // Citations and references
  "\\cite{}": "dummy",
  "\\nocite{}": "ignore",
  "\\cref[]{}": "dummy",
  "\\crefformat{}{}": "ignore",
  "\\Crefformat{}{}": "ignore",
  "\\crefmultiformat{}{}{}{}{}": "ignore",
  "\\Crefmultiformat{}{}{}{}{}": "ignore",
  "\\crtcrefreference{}": "dummy",
  // Changes annotations
  "\\deleted{}": "ignore",
  "\\todo{}": "ignore",
  "\\todo[]{}": "ignore",
  // ...
}
Hiding False Positives
LTeX+ has a mechanism for hiding false positives, but it is fragile, requiring you to either re-mark each false positive whenever any part of the sentence changes or try to write a regular expression to match the false positive.
I don’t recommend either of those methods.
Instead, I define several dummy LaTeX macros to the values "ignore", "dummy", and "voweldummy" that I include in the "ltex.latex.commands" setting:
% Definitions for telling LTeX to ignore certain parts of the LaTeX code.
% Example: "This is a \ltexdummy{miskate}."
\newcommand{\ltexignore}[1]{#1}
\newcommand{\ltexdummy}[1]{#1}
\newcommand{\ltexvoweldummy}[1]{#1}
Then, I mark each macro in "ltex.latex.commands" as follows:
"ltex.latex.commands": {
  // ...
  // Macros to hide LTeX false-positive
  "\\ltexignore{}": "ignore",
  "\\ltexdummy{}": "dummy",
  "\\ltexvoweldummy{}": "vowelDummy"
}
It is also sometimes useful to include text that LTeX reads but is not included in the output.
% Insert a piece of hidden text that is parsed by LTex but is not displayed.
\newcommand{\ltexhidden}[1]{}
Ignoring Irrelevant BibTeX Fields
In BibTeX files, I typically have entries automatically generated by Zotero. Typically, each entry has an abstract and these tend to have a lot of false positives but are not included in the output. Instead of handling each issue individually, I use the "ltex.bibtex.fields" setting to disable LTeX+-checking of bibliography abstracts.
 "ltex.bibtex.fields": {
    # Abstracts in bibliography entries typically are not
    # typed by the user and are rarely inserted into the
    # document, but tend to have a lot of LTeX+ warnings,
    # so I disable warnings for the abstracts.
    "abstract": false
  }
Paste Image: Image Pasting into LaTeX Code
One of my biggest complaints about using LaTeX used to be the difficulty of doing some basic tasks, such as adding an image to a document, that can be done immediately in other document editors.
Adding a picture required saving the file to a particular location, creating a figure environment with \includegraphics inside, and typing or copy/pasting the path to the image.
That’s no longer the case!
In my current setup I can copy-and-paste an image into a LaTeX document using the Paste Image extension.
This extension is not designed for LaTeX in particular, however, so you need to do some specific configuration so that pasted images are placed in a reasonable directory and are properly referenced and formatted within the .tex file.
// In .vscode/settings.json or /path/to/global/settings/settings.json
...
// Where to place the files for pasted images.
"pasteImage.path": "${currentFileDir}/pasted-images",
// The code to insert into LaTeX. (Since the images are placed in
// a directory named pasted-images/ that is in the same directory
// as the current TeX file, the relative path to the file is
// pasted-images/${imageFileName}.)
"pasteImage.insertPattern":
  "\\begin{center}\n\t\t\\includegraphics[width=\\linewidth]{pasted-images/${imageFileName}}\n\t\\end{center}",
// Make Paste Images ask you what to name the file so you don't
// end up with a bunch of files named things like "12-03-2024-12-44-23.png"
"pasteImage.showFilePathConfirmInputBox": true,
// Only ask for the name of the created file, instead of the full path.
"pasteImage.filePathConfirmInputBoxMode": "onlyName",
// Default name.
"pasteImage.defaultName": "${currentFileNameWithoutExt}-HH-mm-ss",
// Don't encode the path for HTML.
"pasteImage.encodePath": "none",
// I don't remember what this does
"pasteImage.basePath": "${currentFileDir}",
...
Dryer Lint Extension
The Dryer Lint extension allows you to define custom linting patterns using regular expressions. I created the Dryer Lint based on the relint by Ryan Blonna. In the subsections below, I list the lint rules that I developed to 1) identify syntax errors before compiling, 2) highlight formatting faux pas, and 3) enforce my preferred coding style. Some other uses you might consider on a project-by-project basis are rules to check for
- A word that should not appear in your document but is similar to a word that you use.
- Check for expressions that you commonly mix up, such as
$\distA{z}$instead of$\distA{x}$ - Check that you use a semantically important macro instead of its definition.
All Dryer Lint rules are defined by JavaScript style regular expressions.
They should be placed in your settings.json file, in the following entry:
  "dryer-lint": {
      "language": "latex",
      "rules": [
          {
            /// Place rules here...

          }
      ]
  }
For writing and testing regular expressions, I recommend using regex101.com.
When writing multi-line rules, the regular expression for line breaks varies between platforms.
On Windows, a line break is \r\n and on Linux it is just \n.
Thus, to get a platform-independent line break, use \r?\n.
Linting Rules for Syntax Errors
This section contains rules that check for syntax errors that will cause LaTeX builds to fail. Since linting happens much faster than compilation, this allows you to catch the mistake quicker.
Check that \cref{}, \cite{}, \ref{}, and \eqref{} do not occur without arguments.
This is particularly helpful for \cref{} because a missing argument generates a cryptic compilation error message.
{
  // Check for \cref{}, \cite{}, \ref{}, or \eqref{} occurring without arguments.
  "name": "Empty Reference or Citation",
  "message": "Missing argument to \\cref, \\cite, \\ref, or \\eqref.",
  "pattern": "\\\\(cref|eqref|ref|cite)\\{\\s*\\}",
  "severity": "Error"
},
For \cite and \cref, which can take comma separated lists of labels, a space after a comma typically indicates a mistake, so the following rule checks that this does not occur:
{
  // Check that a comma-separated list of labels passed to
  // \cref or \cite does have spaces after any commas.
  // Although a trailing space is permitted in labels, it
  // would be better to revise the label by removing the space.
  "name": "Reference has a space after the comma",
  "message": "The argument to \\cref or \\cite has a comma followed by a space. This typically indicates an error because the space will be read as a part of the label.",
  "pattern": "(\\\\(?:cref|cite)\\{[^\\}]*)\\,\\ ",
  "severity": "Warning"
},
Putting a comma or backslash into a LaTeX label causes problems, so this rule checks that the argument to \label{...} does not contain “,” or “".
{
  // Check that \label{} does not contain a comma or a backslash.
  "name": "Illegal Character in \\label{}",
  "message": "\\label{...} must not contain \",\" or \"\\\".",
  // Unescaped Regex: \\label\{[^\}]*[,\\][^\}]*\}
  "pattern": "\\\\label\\{[^\\}]*[\\\\,][^\\}]*\\}",
  "severity": "Error"
},
The following two rules assume that you use $...$ for inline equations and \[...\] for display equations.
One significant advantage of avoiding $$...$$ for display equations, is that we can define the following linting rule that immediately identifies $$ as an error—most likely an inline equation was intended, but the lack of code between the dollar signs cause them to be interpreted as the start of a display equation that inevitably leads to cascading errors through the rest of the document.
{
  // This rule assumes that you write display equations using "\[...\]",
  // which means that "$$" should never appear in your document.
  "name": "Inline equation with empty contents: \"$$\".",
  "pattern": "\\$\\$",
  "severity": "Error",
  "fix": "$ $",
  "message": "\"$$\" should not be used. To insert a display equation, use \"\\[...\\]\"."
},
We also highlight when an inline equation is empty, since this typically indicates an omission.
{
  "name": "Inline equation with empty contents: \"$ $\".",
  "pattern": "\\$[ ]+\\$",
  "severity": "Warning",
  "message": "Inline equation with empty contents: \"$ $\"."
},
In LaTeX, every itemize or enumerate environment must begin with \item (not counting spaces or comments).
The following rule displays an error when \item is missing or preceded by other code.
{
  "name": "Itemize must start with an item",
  // Regex101.com link: https://regex101.com/r/9Ck04q/2
  // Regular expression (unescaped):
  //      "\\begin\{itemize\}(?:[ \t]*(?:%[^\n]*)?\r?\n)*[ \t]*(\S(?<!%|\\).*|\\(?!item).*)"
  // Explanation:
  //  1. "\\begin\{(?:itemize|enumerate|description)\}" matches the start
  //     of the itemize, enumerate, or description environment.
  //  2. "(?:[ \t]*(?:%[^\n]*)?\r?\n)*" matches any number of comment lines or empty lines.
  //  3. "[ \t]*(\S(?<!%|\\).*|\\(?!item).*)" matches the first non-empty
  //     non-comment line unless it starts with \item. More precisely:
  //     3.1 "[ \t]*" matches any leading whitespace.
  //     3.2 "\S(?<!%|\\).*" matches the non-white space, expect for comment
  //         tokens ("%") or the start of a command sequence ("\").
  //         The ".*" causes the error to be displayed extending to the end
  //         of the line.
  //  4. "\\(?!item).*" matches a command sequence (i.e., starting with "\") except for "\item",
  //     which is excluded by the negated lookbehind "(?!item)".
  "pattern": "\\\\begin\\{(?:itemize|enumerate|description)\\}(?:[ \\t]*(?:%[^\\n]*)?\\r?\\n)*[ \\t]*(\\S(?<!%|\\\\).*|\\\\(?!item).*)",
  "message": "List environments must start with \\item.",
  "severity": "Error",
  "maxLines": 5
},
Linting Rules for Document Style
These rules enforce syntax that affect the appearance of the rendered document.
The following rules check that non-breaking spaces are used before \cite{...}, \ref{}, and \eqref{}, and before \cref{} when referencing an equation.
The \cite{} rule is suitable for numerical in-line citation formats, such as IEEE citations that look like “[12]”.
{
    "name": "Missing non-breaking space before \\cite",
    "message": "Use \"~\" (non-breaking space) before `\\cite` to prevent awkward line breaks.",
    "pattern": "[ ]\\\\cite\\{",
    "severity": "Information",
    "fix": "~\\cite\\{"
},
The \cref{} rule requires that you are using the cleveref package and label equations using labels starting with “eq:”.
You should also have cleveref configured to reference equations using a number inside a parenthesis, e.g., “(12)” rather than “Eq. 12”.
{
    // Check for a space before the reference to an equation.
    // This rule requires that you label all equations with a prefix "eq:".
    "name": "Missing non-breaking space before cleveref equation reference",
    "message": "Use \"~\" (non-breaking space) before referencing an equation to prevent awkward line breaks.",
    "pattern": "[ ]\\\\cref\\{eq:",
    "severity": "Information",
    "fix": "~\\cref{eq:"
},
{
    "name": "Missing non-breaking space before references",
    "message": "Use \"~\" (non-breaking space) before \"\\eqref{}\" and \"\\ref{}\" to prevent awkward line breaks before the inserted number.",
    "pattern": "[ ]\\\\(eqref|ref)\\{",
    "severity": "Information",
    "fix": "~\\$1{:"
},
The punctuation at the end of a display equation should be placed inside the equation delimiters (“\[...\]”).
Otherwise, the punctuation will be displayed incorrectly below the equation:
\[a^2 + b^2 = c^2\].
{
    "name": "Punctuation outside Display Equation",
    "pattern": "\\\\][.,;]",
    "severity": "Warning",
    "message": "Place punctuation inside display equation, before \"\\]\"."
},
The following rule checks for extra line breaks at the end of align, aligned, and cases environments.
{
    "name": "Multiline equation environment has extra line at end",
    "pattern": "(?:\\\\){2}[ \\t]*\\r?\\n[ \\t]*\\\\end{(?:align[*]?|aligned|cases)}",
    "severity": "Warning",
    "message": "Extra line break at the end of environment.",
    "maxLines": 2
},
Linting Rules for Code Style
This section has linting rules I use to enforce my preferred LaTeX code style. Adapt them to match your preferences.
{
    "name": "Display equation starts on new line unless the preceding line is short",
    "message": "Display equations (\"\\[....\\]\") should start on a new line unless the preceding text is shorter than 15 characters.",
    // The length of the non-leading-whitespace string is 15 or more because
    // "[^ \\t%]" is 1 character and ".{14,}" is 14 or more characters.
    "pattern": "^([ \\t]*)([^ \\t%].{14,}) \\\\\\[",
    "fix": "$1$2\n$1\\[",
    "severity": "Information"
},
{
    "name": "Display equations should be followed by a new line",
    "message": "Display equations (\"\\[....\\]\") should be followed by a new line.",
    "pattern": "\\\\\\][ \\t]*(\\S)",
    "severity": "Information"
},
{
    "name": "Use spaces for indentation",
    "pattern": "^[ ]*[\\t][\\t ]*",
    "severity": "Information",
    "message": "Use spaces for indentation instead of tabs. Run \"Convert indentation to spaces\" to fix.",
},
{
    // The pattern matches a line that contains a sentence that ends
    // with a period and the next line starts with a word character.
    // The fix inserts a newline between the two lines.
    "name": "Start each sentence on a new line",
    "message": "Code style: Start each sentence on a new line.",
    // Regex: ^([ \t]*)((?:[^%]|(?<=\\)%).*\w\.)[ ]+(\w)
    // Parts:
    // 1. Leading whitespace: ^([ \t]*)
    // 2. Any character except an unescaped comment character
    //    ("%" but not "\%"): (?:[^%]|(?<=\\)%)
    // 2. Check that the "period" is not preceded by \big or \Big,
    //    indicating that it is actually
    //    being used to increase the size of delimiters: (?<!\\big|\\Big)
    // 3. Sentence ending with a period, but not in a comment: ((?:[^%]|(?<=\\)%)*\.)
    // 4. Whitespace between sentences: [ ]+
    // 5. First letter of the next sentence: (\w)
    "pattern": "^([ \\t]*)((?:[^%]|(?<=\\\\)%)*(?<!\\\\big|\\\\Big)\\.)[ ]+(\\w)",
    "severity": "Information",
    "fix": "$1$2\n$1$3",
},
Overleaf Workshop Extension
The Overleaf Workshop extension allows editing Overleaf Projects in VS Code.
Once you have VS Code nicely set up, you may find that you are occasionally collaborating with coauthors who wish to use Overleaf. While Overleaf is great for synchronized editing, the loss of VS Code features can be jarring once you are accustomed to them.
The Overleaf Workshop extension bridges this gap by allowing you to sync Overleaf projects with VS Code, but it comes with some major caveats. Overleaf Workshop provides two methods for opening projects:
- Open the project with a virtual workspace that continually syncs with Overleaf, or
- “Open Project Locally”, which creates a local copy.
Both methods have major drawbacks. The virtual workspace approach does not support LaTeX Workshop, so you lose all the nice features from that extension. On the other hand,
Alternative: Syncing with Overleaf Projects with Git
If you have a premium Overleaf account, you can use Git integration to sync an Overleaf project to your computer, allowing you to safely modify the project and then push the changes back to Overleaf.
Using Git incurs some overhead with pushing, pushing, and (possibly) merging, but it may be worth the upsides of editing Overleaf documents with the exact same tools as any of your local LaTeX documents.
Code Formatting
In any programming languages, adopting a sensible and consistent coding style improves readability and maintainability, and sometimes highlights errors that would otherwise go unnoticed.
Previous sources have written at length about LaTeX coding style (see “Towards LATEX coding standards” by Didier Verna). I will add my two cents for a piece of code style that substantially improves tracking changes in Git. When I first started writing LaTeX, I would put entire paragraphs on a single line of code, with line wrapping turned on in the editor. While editing, this was …fine, but caused difficulties in version control. In particular, when I was committing or merging changes in Git, it would be difficult to see where in a line changes were made. Later, I switched to adding line breaks after every 80 characters or so (without regards to sentences), so that the entirety of each line code would be visible line wrapping off. This fixed the difficulty with seeing diff’s, but required a lot of effort to keep each line roughly my desired width.
To fix both problems, I now write every sentence on its own line. As an added benefit, having a one sentence per line allows for easily checking the lengths of sentence to see if any are too long and if there is a nice variation lengths.
To make word-wrapping appear nicely in the editor, I use the following settings:
  "editor.wordWrap": "on",
  "editor.wrappingIndent": "indent"
Sometimes, word wrap in the editor makes certain tasks more difficult (especially when using multi-cursors on aligned text), in which case you can use the command pallet (or the shortcut shown therein) to toggle word wrap:
- Open command pallet (
CTRL+SHIFT+Pon Windows) - Select
View: Toggle Word Wrap(CTRL+SHIRT+Pon Windows)
I published the Dryer Lint extension, described above, to help (among other things) enforce a consistent code style.
VS Code Snippets
The following code contains snippets I’ve developed for LaTeX. For a description of VS Code snippets, see here. I have provided the snippets largely without explanation, here, except for some documentation of the more complicated regular expressions. For experimenting with regular expressions, I recommend regex101.com. You can find all of my snippets in a GitHub repository here.
To add these snippets to your VS Code environment,
- Open the Command Pallet
- Run
Snippets: Configure Snippets - Select
latex.json(for global snippets) orlatex.code-snippets(for workspace snippets). In my setup,latex.code-snippetssays “global” after it, but it actually is only for defining snippets in the current workspace.
Equations
...
// Equations
"Display Equation":{
  "prefix": ["\\["],
  "body": [
    // If the current line is not empty, then insert an empty line.
    "${TM_CURRENT_LINE/(?:^(\\s*)\\S.*$|(^\\s*$))/${1:+\n}$1/}\\[",
      "\t$TM_SELECTED_TEXT$1",
    "\\] $0"
  ],
  "description": "Insert block equation with line-breaks and indentation."
},
"Inline Equation":{
  "body": [
    "$$TM_SELECTED_TEXT$1$$0"
  ],
  "description": "Insert inline equation."
},
"Equation Environment":{
  "prefix": ["\\equation"],
  "body": [
    "\\begin{equation}",
      "\t\\label{eq:$RANDOM_HEX}",
      // Regex (unescaped): \s*(?:\\\[\s*((?:.(?:\s*)??)*)\s*\\\]|((?:.|\s)+))\s*
      //   Match either "  \[ \n .... \] " or just the entire contents and insert it as the body of the equation.
      //   Explanation:
      //      (?:\s*)??: Match any number of spaces *including line breaks* but
      //								 only if needed to allow for subsequent non-space characters.
      "\t${TM_SELECTED_TEXT/\\s*(?:\\s*\\\\\\[\\s*((?:.(?:\\s*\\S)?)*)\\s*\\\\\\]\\s*|((?:.|\\s)+))\\s*/$1$2/}$1$0",
    "\\end{equation}",
    ""
  ],
  "description": "Insert equation environment with a random hexadecimal label."
},
"Generate Equation Label":{
  "prefix": ["\\eqlabel"],
  "body": [
    // Automatically generate a label from the contents of the equation, deleting any backslashes or ambersands.
    "\\label{eq:${TM_SELECTED_TEXT/[\\\\&,]//g}${1/[\\\\&,]//g}$1}",
    "$TM_SELECTED_TEXT$0"
  ],
  "description": "Create an equation label that is automatically generated from the selected text."
},
"Display Equation to Equation Environment":{
  "body": [
    // Group 1: Before text. "(.*?)"
    // Group 2: Tab spaces before equation delimiter. "(\\h*)"
    // Group 3: Equation contents "(.*?)"
    // Group 4: After text "(.*)"
    "${TM_SELECTED_TEXT/(.*?)(\\h*)\\\\\\[\\s*(.*?)\\s*\\\\\\](.*)/$1$2\\begin{equation}\n$2\t$3\n$2\\end{equation}\n/s}"
  ],
  "description": "Convert a display equation to an equation environment."
},
"Convert inline to display equation":{
  "body": [
    // Unescaped RegEx: ([\S\s]*)\$\s*(.*?)\s*\$([,.]{0,1})([\S\s]*)
    // Group 1: Content before equation. ("[\S\s]" matches any character)
    // Group 2: Contents of equation, stripping white space.
    // Group 3: Punctuation after equation ("[,.]{0,1}" matches "," or "." zero or one times)
    // Group 4: Content after equation
    // We duplicate the Regex for each line so that VS code automatically inserts the correct indentation for us, instead of handling it in the regex.
    "${TM_SELECTED_TEXT/([\\S\\s]*)\\$\\s*(.*?)\\s*\\$([,.]{0,1})\\s*([\\S\\s]*)/$1/s}",
    "\\[",
    // It's important to put "\t" before "${TM_SELECTED_TEXT...}" instead of inside it so that VS code inserts tabs or spaces according to you configuration. If it's inside the regex, then it inserts a tab character.
    "\t${TM_SELECTED_TEXT/([\\S\\s]*)\\$\\s*(.*?)\\s*\\$([,.]{0,1})\\s*([\\S\\s]*)/$2$3/s}",
    "\\]",
    "${TM_SELECTED_TEXT/([\\S\\s]*)\\$\\s*(.*?)\\s*\\$([,.]{0,1})\\s*([\\S\\s]*)/$4/s}",
  ],
  "description": "Convert an inline equation to a display equation."
},
"Convert display to inline equation":{
  "body": [
    // Regular expression (unescaped): (.*)\\\[\s*\n*\s*(.*?)\s*\n*\s*\\\](.*)
    // - "\s*" matches any number of spaces and line breaks around it.
    // - "[\s\S]" matches any character, including line breaks and spaces.
    // - "\\\[" Matches "\[" (there are three backslashes because "\\" matches "\" and "\[" matches "[").
    // Group 1: All the content before the equation.
    // Group 2: All the content in the equation, except for final punctuation
    // Group 3: Final punctuation ("[,.]{0,1}").
    // Group 4: All the content after the equation.
    "${TM_SELECTED_TEXT/([\\S\\s]*)\\\\\\[\\s*([\\S\\s]*?)\\s*([,.]{0,1})\\s*\\\\\\]([\\S\\s]*)/$1$$2$$3$4/s}",

  ],
  "description": "Convert a display equation to an inline equation."
},

"Subequations":{
  "prefix": ["\\subequations", "\\begin{subequations}", "equations group", "equation group"],
  "description": "Insert a group of equations that share the number, e.g., (3a), (3b), (3c).",
  "body": [
    "\\begin{subequations}",
    "\t\\label{eq:${1:equation block label}}",
    "\t\\begin{align}",
    "\t\t$0",
    "\t\\end{align}",
    "\\end{subequations}"
  ]
}
...
Lists
...
// Lists: Enumerate, Itemize, and Description
"Add \\item after each line break":{
  "prefix": ["\\itemafterlines"],
  "body": [
    "${TM_SELECTED_TEXT/(\\n)(\\s*)/$1$2\\item /g}"
  ],
  "description": "Insert a citation."
},
"Itemize with \\item after each line":{
  "prefix": ["\\itemize"],
  "body": [
    "\\begin{itemize}",
    "\t\\item ${TM_SELECTED_TEXT/(\\n)(\\s*)/$1$2\\item /g}",
    "\\end{itemize}",
    ""
  ]
}
...
Section Headers
...
"Section Labeled":{
  // "prefix": ["\\sectionlabeled"],
  "prefix": ["\\section"],
  "body": [
    "",
    "%===================================",
    "%===================================",
    "\\section{$TM_SELECTED_TEXT${1:Header}}",
    "\\label{sec:${TM_SELECTED_TEXT/[\\\\&\\v\\{\\}\\[\\]$]//g}${1/[\\\\&\\\\{\\}\\[\\]$]//g}}",
    "$0"
  ]
},
"Subsection":{
  "prefix": ["\\subsection"],
  "body": [
    "",
    "%================================",
    "\\subsection{$TM_SELECTED_TEXT${1:Header}}",
    "\\label{sec:${TM_SELECTED_TEXT/[\\\\&\\v\\{\\}\\[\\]$]//g}${1/[\\\\&\\v\\{\\}\\[\\]$]//g}}",
    "$0"
  ]
},
"Subsubsction":{
  "prefix": ["\\subsubsection"],
  "body": [
    "",
    "\\subsubsection{$TM_SELECTED_TEXT${1:Header}}",
    "\\label{sec:${TM_SELECTED_TEXT/[\\\\&\\v\\{\\}\\[\\]$]//g}${1/[\\\\&\\v\\{\\}\\[\\]$]//g}}",
    "$0"
  ]
}
...
Math Function Macros with Arguments
...
"Inner product":{
  "prefix": ["\\ip"],
  "body": [
    "\\ip{$TM_SELECTED_TEXT$1}{$2}$0 "
  ]
},
"Absolute value":{
  "prefix": ["\\abs"],
  "body": [
    "\\abs{$TM_SELECTED_TEXT$1}$0 "
  ]
},
"Norm":{
  "prefix": ["\\norm"],
  "body": [
    "\\norm{$TM_SELECTED_TEXT$1}$0 "
  ]
}
...
Text formatting
...
"Emphasis":{
  "prefix": ["epmh","\\emph"],
  "body": [
    "\\emph{$TM_SELECTED_TEXT$1}$0"
  ]
},
"Bold":{
  "prefix": ["bold","\\bold"],
  "body": [
    "\\textbf{$TM_SELECTED_TEXT$1}$0"
  ]
},
"Teletype":{
  "prefix": ["t","\\tt"],
  "body": [
    "\\texttt{$TM_SELECTED_TEXT$1}$0"
  ]
},
    "Hyperlink (includes link)":{
  "prefix": ["\\href","\\hyperlink", "\\url"],
  "body": [
    "\\href{${1:url}}{$TM_SELECTED_TEXT$2}$0"
  ]
},
"Hyperlink (no link)":{
  "prefix": ["\\url"],
  "body": [
    "\\url{$TM_SELECTED_TEXT$2}$0"
  ]
}
...
Environments
...
"Definition (labeled)":{
  "prefix": ["\\definition (labeled)"],
  "body": [
    "\\begin{definition}[${1:Name of Defined Term}]",
    "\t\\label{def:${1:label}}",
    "\t$TM_SELECTED_TEXT$0",
    "\\end{definition}"
  ]
},
"Example (labeled)":{
  "prefix": ["\\example (labeled)"],
  "body": [
    "\\begin{example}[${2:Example Name}]",
      "\t\\label{example:${1:Example Name}}",
      "\t$TM_SELECTED_TEXT$0",
    "\\end{example}"
  ]
}
...
Changes Annotations
...
"Added":{
  "prefix": ["\\added"],
  "body": [
    "\\added{$TM_SELECTED_TEXT$1}$0"
  ]
},
"Added Multi-line":{
  "prefix": ["\\added%"],
  "body": [
    "\\added{%%%%%%%%%% ADDED %%%%%",
    "$TM_SELECTED_TEXT$0",
    "}%%%% END ADDED %%%%"
    // "" // Ensure there is a new line at end
  ]
},
"Deleted":{
  "prefix": ["\\deleted"],
  "body": [
    "\\deleted{$TM_SELECTED_TEXT$1}$0"
  ]
},
"Deleted Multiline":{
  "prefix": ["\\deleted%"],
  "body": [
    "\\deleted{%%%%%%%%%% DELETED %%%%%",
    "\t$TM_SELECTED_TEXT$0",
    "}%%%%%%%%%% END DELETED %%%%%",
    // "" // Ensure there is a new line at end
  ]
},
"Replaced":{
  "prefix": ["\\replaced"],
  "body": [
    "\\replaced{$TM_SELECTED_TEXT$1}{$TM_SELECTED_TEXT}$0"
  ]
},
"Replaced Multiline":{
  "prefix": ["\\replaced%", "\\replaced (block)"],
  "body": [
    "\\replaced{% New Text",
    "$TM_SELECTED_TEXT$0",
    "}{% Old Text",
    "\t$TM_SELECTED_TEXT",
    "}% End \\replaced block",
    // "" // Ensure there is a new line at end
  ]
}
Tables and Columns
...
// ======== COLUMNS =========
"Inline Table":{
  "prefix": ["table", "tabular"],
  "body": [
    "\\begin{center}",
        "\t\\begin{tabular}{$1}",
            "\t\t$TM_SELECTED_TEXT$0",
        "\t\\end{tabular}",
    "\\end{center}"
  ]
},
"Two Columns":{
  "prefix": ["\\columns (2)","\\twocolumns"],
  "body": [
    "\\begin{columns}",
      "\t\\begin{column}[T]{0.48\\textwidth}",
        "\t\t$TM_SELECTED_TEXT$1",
      "\t\\end{column}",
      "\t\\hfill",
      "\t\\begin{column}[T]{0.48\\textwidth}",
        "\t\t$2",
      "\t\\end{column}",
    "\\end{columns}",
    "$0"
  ]
},
"Three Columns":{
  "prefix": ["\\columns (3)", "\\threecolumns"],
  "body": [
    "\\begin{columns}",
      "\t\\begin{column}[T]{0.31\\textwidth}",
        "\t\t$TM_SELECTED_TEXT$1",
      "\t\\end{column}",
      "\t\\hfill",
      "\t\\begin{column}[T]{0.31\\textwidth}",
        "\t\t$2",
      "\t\\end{column}",
      "\t\\hfill",
      "\t\\begin{column}[T]{0.31\\textwidth}",
        "\t\t$3",
      "\t\\end{column}",
    "\\end{columns}",
    "$0"
  ]
},
"Four Columns":{
  "prefix": ["\\columns (4)", "\\fourcolumns"],
  "body": [
    "\\begin{columns}",
      "\t\\begin{column}[T]{0.23\\textwidth}",
        "\t\t$TM_SELECTED_TEXT$1",
      "\t\\end{column}",
      "\t\\hfill",
      "\t\\begin{column}[T]{0.23\\textwidth}",
        "\t\t$2",
      "\t\\end{column}",
      "\t\\hfill",
      "\t\\begin{column}[T]{0.23\\textwidth}",
        "\t\t$3",
      "\t\\end{column}",
      "\t\\hfill",
      "\t\\begin{column}[T]{0.23\\textwidth}",
        "\t\t$4",
      "\t\\end{column}",
    "\\end{columns}",
    "$0"
  ]
},
"Full-width Minipage (no page breaks)":{
  "prefix": ["\\minipage", "\\nopagebreak"],
  "body": [
    "\\begin{minipage}{\\linewidth}%",
      "\t\\centering",
      "\t$TM_SELECTED_TEXT$0",
    "\\end{minipage}%"
  ]
},
// Insert columns
"Two Columns (Minipages)":{
  "prefix": ["\\minipage columns (2)","\\twominipages"],
  "body": [
    "\\begin{minipage}{0.49\\linewidth}%",
      "\t\\centering",
      "\t$TM_SELECTED_TEXT$1",
    "\\end{minipage}%",
    "\\hfill",
    "\\begin{minipage}{0.49\\linewidth}%",
        "\t\\centering",
        "\t$2",
    "\\end{minipage}%",
    "$0"
  ]
},
"Two Columns (Table)":{
  "prefix": ["\\table columns (2)","\\twocolumntable"],
  "body": [
    "\\begin{center}",
        "\t\\begin{tabular}{p{0.47\\linewidth}p{0.47\\linewidth}}",
          "\t\t$TM_SELECTED_TEXT$1 & $0",
        "\t\\end{tabular}",
    "\\end{center}"
  ]
},
"Three Columns (Table)":{
  "prefix": ["\\table columns (3)","\\threecolumntable"],
  "body": [
    "\\begin{center}",
        "\t\\begin{tabular}{p{0.31\\linewidth}p{0.31\\linewidth}p{0.31\\linewidth}}",
          "\t\t$TM_SELECTED_TEXT$1 & $2 & $0",
        "\t\\end{tabular}",
    "\\end{center}"
  ]
},
"Four Columns (Table)":{
  "prefix": ["\\table columns (4)","\\fourcolumntable"],
  "body": [
    "\\begin{center}",
      "\t\\begin{tabular}{p{0.23\\linewidth}p{0.23\\linewidth}p{0.23\\linewidth}p{0.23\\linewidth}}",
          "\t\t$TM_SELECTED_TEXT$1 & $2 & $3 & $0",
        "\t\\end{tabular}",
    "\\end{center}"
  ]
}
...
Beamer Slides
...
// ======== BEAMER ==========
"Beamer Frame":{
  "prefix": ["\\frame", "\\begin{frame}"],
  "body": [
    "\\begin{frame}{${1:title}}",
    "\t$TM_SELECTED_TEXT$0",
    "\\end{frame}"
  ]
},
"Beamer Frame (Top aligned)":{
  "prefix": ["\\frametop", "\\begin{frame}[t]", "frame top"],
  "body": [
    "\\begin{frame}[t]{${1:title}}",
    "\t$TM_SELECTED_TEXT$0",
    "\\end{frame}"
  ]
},
"Structure":{
  "prefix": ["\\structure"],
  "body": [
    "\\structure{$TM_SELECTED_TEXT$1}$0"
  ]
},
"Structure (Math)":{
  // Requires "\newcommand{\mstructure}[1]{{\color{structure} #1}}"
  "prefix": ["\\mstructure", "\\structure (math)"],
  "body": [
    "\\mstructure{$TM_SELECTED_TEXT$1}$0"
  ]
},
"Only Exist on Slide":{
  "prefix": "\\only",
  "body": "\\only<${1:overlay specification}>{$TM_SELECTED_TEXT$0}"
},
"Only Exist on Slide (Block)":{
  "prefix": "\\onlyblock",
  "body": [
    "\\only<${1:overlay specification}>{%",
      "\t$TM_SELECTED_TEXT$0",
    "}% End only block"
  ]
},
"Only Shown on Slide":{
  "prefix": "\\onslide",
  "body": "\\onslide<${1:overlay specification}>{$TM_SELECTED_TEXT$0}"
},
"Only Shown on Slide (Block)":{
  "prefix": "\\onslideblock",
  "body": [
    "\\onslide<${1:overlay specification}>{%",
      "\t$TM_SELECTED_TEXT$0",
    "}% End only block"
  ]
},
"Pause After Itemize or <+->":{
  "prefix": ["\\pauseafter<+->", "\\pauseAfterItemize"],
  "body": [
    "\\pause[\\thebeamerpauses]",
    "$0"
  ]
}
Snippets for VS Code Multi-cursor
One feature of VS Code that includes Here are some snippets that can be used in any language.
To set global snippets, for all languages:
- Open the command pallet (
CTRL+SHIFT+Pby default on Windows). - Type and select
Snippets: Configure Snippets. - Select
all_languages.json.code-snippets (global).
I have two groups of snippets. One group contains snippets for inserting enumerations when using multi-cursors and the other group has snippets for inserting duplicated information (producing multi-cursors).
"Cursor index (starts at 0)":{
  "prefix": ["\\cursorindex", "\\ndx"],
  "body" : ["$CURSOR_INDEX"]
},
"Cursor number (starts at 1)":{
  "prefix": ["\\cursornum", "\\num"],
  "body" : ["$CURSOR_NUMBER"]
},
"Cursor uppercase Alphabet (A, B, C, ..., I)":{
  "prefix": ["\\cursorAlph", "\\Alph"],
  "body" : ["${CURSOR_NUMBER/(^1$)?(^2$)?(^3$)?(^4$)?(^5$)?(^6$)?(^7$)?(^8$)?(^9$)?(^10$)?(^11$)?(^12$)?(^13$)?(^14$)?(^15$)?(^16$)?(^17$)?(^18$)?(^19$)?(^20$)?(^21$)?(^22$)?(^23$)?(^24$)?(^25$)?(^26$)?/${1:+A}${2:+B}${3:+C}${4:+D}${5:+E}${6:+F}${7:+G}${8:+H}${9:+I}${10:+J}${11:+K}${12:+L}${13:+M}${14:+N}${15:+O}${16:+P}${17:+Q}${18:+R}${19:+S}${20:+T}${21:+U}${22:+V}${23:+W}${24:+X}${25:+Y}${26:+Z}/}"]
},
"Cursor lowercase alphabet (a, b, c, ..., i)":{
  "prefix": ["\\cursoralph", "\\alph"],
  "body" : ["${CURSOR_NUMBER/(^1$)?(^2$)?(^3$)?(^4$)?(^5$)?(^6$)?(^7$)?(^8$)?(^9$)?(^10$)?(^11$)?(^12$)?(^13$)?(^14$)?(^15$)?(^16$)?(^17$)?(^18$)?(^19$)?(^20$)?(^21$)?(^22$)?(^23$)?(^24$)?(^25$)?(^26$)?/${1:+a}${2:+b}${3:+c}${4:+d}${5:+e}${6:+f}${7:+g}${8:+h}${9:+i}${10:+j}${11:+k}${12:+l}${13:+m}${14:+n}${15:+o}${16:+p}${17:+q}${18:+r}${19:+s}${20:+t}${21:+u}${22:+v}${23:+w}${24:+x}${25:+y}${26:+z}/}"]
},
"Cursor lowercase Roman (i, ii, iii, ..., xx)":{
  "prefix": ["\\roman", "\\cursorroman"],
  "body" : ["${CURSOR_NUMBER/(^1$)?(^2$)?(^3$)?(^4$)?(^5$)?(^6$)?(^7$)?(^8$)?(^9$)?(^10$)?(^11$)?(^12$)?(^13$)?(^14$)?(^15$)?(^16$)?(^17$)?(^18$)?(^19$)?(^20$)?/${1:+i}${2:+ii}${3:+iii}${4:+iv}${5:+v}${6:+vi}${7:+vii}${8:+viii}${9:+ix}${10:+x}${11:+xi}${12:+xii}${13:+xiii}${14:+xiv}${15:+xv}${16:+xvi}${17:+xvii}${18:+xviii}${19:+xix}${20:+xx}/}"]
},
"Cursor uppercase Roman (I, II, III, ..., XX)":{
  "prefix": ["\\Roman", "\\cursorRoman"],
  "body" : ["${CURSOR_NUMBER/(^1$)?(^2$)?(^3$)?(^4$)?(^5$)?(^6$)?(^7$)?(^8$)?(^9$)?(^10$)?(^11$)?(^12$)?(^13$)?(^14$)?(^15$)?(^16$)?(^17$)?(^18$)?(^19$)?(^20$)?/${1:+I}${2:+II}${3:+III}${4:+IV}${5:+V}${6:+VI}${7:+VII}${8:+VIII}${9:+IX}${10:+X}${11:+XI}${12:+XII}${13:+XIII}${14:+XIV}${15:+XV}${16:+XVI}${17:+XVII}${18:+XVIII}${19:+XIX}${20:+XX}/}"]
}
// Duplicated text entry with multi-cursors.
"2x":{
  "prefix": ["\\2x"],
  "body" : ["${1:$TM_SELECTED_TEXT}${4:, }$1$0"]
},
"3x":{
  "prefix": ["\\3x"],
  "body" : ["${1:$TM_SELECTED_TEXT}${2:, }$1${2:, }$1$0"]
},
"4x":{
  "prefix": ["\\4x"],
  "body" : ["${1:$TM_SELECTED_TEXT}${2:, }$1${2:, }$1${2:, }$1$0"]
},
"5x":{
  "prefix": ["\\5x"],
  "body" : ["${1:$TM_SELECTED_TEXT}${2:, }$1${2:, }$1${2:, }$1${2:, }$1$0"]
},
"6x":{
  "prefix": ["\\6x"],
  "body" : ["${1:$TM_SELECTED_TEXT}${2:, }$1${2:, }$1${2:, }$1${2:, }$1${2:, }$1$0"]
},
"7x":{
  "prefix": ["\\7x"],
  "body" : ["${1:$TM_SELECTED_TEXT}${2:, }$1${2:, }$1${2:, }$1${2:, }$1${2:, }$1${2:, }$1$0"]
},
"nx":{
  "prefix": ["\\nx"],
  "body" : ["${1:$TM_SELECTED_TEXT}1${5:, }${1}2${5}${2|\\cdots,\\vdots,\\dots|}${5}${1}${6:n}$0"]
}
LaTeX Development
This section contains info about setting up VS Code for development of LaTeX packages or classes. I don’t expect the suggestions to be useful if you are just writing documents in LaTeX without writing your own packages or classes.
Code Spell Extension
When writing LaTeX packages or classes, it is nice to have a spell checker that is designed for code rather than documents.
The Code Spell extension serves this purpose.
In contrast to LTeX+, Code Spell will check variable names that are formed from the conjunction of multiple words such as is_ready or MyVariable, and allows for defining language specific dictionaries to avoid false positives when you use predefined names such as includegraphics in LaTeX.
My LaTeX dictionary (incomplete) is available here.
To create the dictionary file, you can use the Command Spell: Create a Custom Dictionary in the VS Code Command Pallet (CTRL + SHIFT + P or CMD + SHIFT + P, by default).
My Code Spell settings in settings.json are shown here:
"cSpell.customDictionaries": {
  "latex": {
      "addWords": true,
      "name": "latex",
      "path": "C:/path/to/dictionary/latex.txt",
      "scope": "user"
  },
  "custom": true, // Enable the `custom` dictionary
},
"cSpell.languageSettings": [
  {
    "dictionaries": [
        "latex"
    ],
    "languageId": ["tex", "latex-expl3"]
  },
],
// Add names and other words to the dictionary
// that are specific to your work, but not language specific.
"cSpell.userWords": [
  "Wintz",
  // ...
]
Conclusion
Using VS Code for LaTeX development can be highly efficient with the right tools and configurations. By integrating extensions like LaTeX Workshop, LTeX+, and Paste Image, alongside structured project organization, you can significantly streamline your workflow. Explore these configurations to tailor a setup that works best for you!